
First off: KATDASH is not a magic bullet for your electrical system. It’s simply a different lighting unit from the original bulb carrier. It will function properly, if the wire connections going in and out are in good condition & working properly. If you’ve got a charging problem, you need to diagnose that separately. Here is Snowbum’s information on GEN light issues: http://bmwmotorcycletech.info/trbleshootALT.htm Scroll about half way down to: “GEN Lamp Problems.
I am not a “Guru”; I’m simply another Airhead who likes to work on her own bike, and got tired of trying to keep a ratty broken instrument dash flex working.
PLEASE SCROLL TO THE BOTTOM OF THE PAGE FOR ALL OUR INSTALLATION INSTRUCTIONS
DOES THE GEN LIGHT CIRCUIT WORK/ WILL MY BIKE CHARGE PROPERLY?
Yes. The GEN light circuit is designed to replace the oem bulb filament, and has additional resistance & current flow to do the initial energizing of your alternator at start up. When you first start your bike, you will have to rev it up just slightly higher to get the alternator spinning and the current flowing, which then turns the led GEN lamp out. After the bike is running, the led GEN lamp will act exactly the same as with an incandescent bulb. If you have a modern, high output alternator, you probably won’t even notice any difference in when the GEN light goes on or off.
WHAT’S THE BIG DEAL- I CAN GET LED BULBS ANYWHERE AND PLUG THEM INTO MY INSTRUMENT GAUGE?
This is not a bunch of led “light bulbs”- which are basically 2-16 led chips assembled onto a frame and a bulb socket for the specific application. This is a complete replacement of the entire oem bulb frame, flexible circuit board, and bulbs. There are NO MORE BULBS- so no more broken copper connector flaps to deal with. This is tiny led light chips, and a lot of resistors all soldered onto a brand NEW FLEXIBLE pcb and assembled with NEW, re-designed connector pins on a NEW plastic body frame. There are no more copper connectors to corrode or break off, and no more bulbs. This is a fully compatible, plug and play replacement unit- take out your old non-functional bulb carrier, and drop in your new solid state KATDASH unit. Replace the screws and covers and you’re all set for another 20 years of working instrument pod lighting.
HOW LONG WILL THE LED LIGHTS LAST?
Manufacturers typically state that leds will last 10,000 hours to ½ brightness, which is when they’re considered “burned out”. I can tell you we have had a “continuous on” test unit going in the office since April 2016. As of Jan 2018, we’re at over 15,000 hours, and they’re all still on. [at an average of 40mph and 10,000 miles per year, 5000 hours = 20 years of led lit instruments]
IF A LED BURNS OUT, CAN I FIX IT MYSELF?
No. Send it back to us. If it’s within warrantee, I will replace it free. If it’s 10 years from now, I will probably replace the flex for a moderate cost. With my KATDASH, the flex is replaceable, unlike the oem boards.
WHY DOES THE LED BULB STAY LIT OR GLOW WHEN THE ORIGINAL BULB WOULD HAVE BEEN OFF?
Leds are much more sensitive to current. It takes very little electricity to get an led to light up- this is why they’re being used everywhere to “save energy”. So the leds are more sensitive to leaked current: dirt, water, corroded connections, broken or cracked insulation on the wire- any of these can create a tiny ground for the current and will make the led glow. If one of your lights is glowing dimly, you probably have a ground leak somewhere. If your GEN light is glowing all the time, your charging system may not be producing much voltage. Refer to Snowbum’s Gen Lamp Problem page: http://bmwmotorcycletech.info/trbleshootalt.htm
If your turn signal indicator is glowing, you most likely have a problem with the flasher relay in the headlight bucket. See “about turn signal relays” below.
CHANGING OR SWAPPING GAUGES (or KATDASH light units)
I ran into a guy, who had somehow gotten a 1978 (version 2) pod installed on his 1976 (version 1) R90. He was complaining that the oem light board had been mis-wired or messed up by the repair shop he had sent the instrument pod to. I tried to explain to him; you can’t swap instrument cases or electrical units between versions without changing (or re-wiring) the 12 pin main wiring harness plug! The oem light board and the KATDASH unit are both run off of the pin arrangement from the 12 pin plug at the rear of the unit on the main wiring harness. If you put a V2 pod on a V1 bike- it still thinks the turn signal is at the bottom of the dash: so the V2 pod brake warning light will flash – because that’s the light that’s connected to the V1 turn signal pins. It’s the same with the oil and neural light location swap between V1 & V2: In this case his oil light came on when ever he was in neutral. If you have any questions about which version you have, please call me at the office before ordering so we can figure out which unit you should order.
GEN LIGHT FLICKER
We have had a couple of reports of the GEN light flickering dimly, after initial startup, between about 1700 – 2500 rpm. This flicker happens, after the bike is started and the GEN light goes out. This will only occur on a few oem systems, IF you are starting or running your bike WITH NO LOAD on the system- ie: with the headlight and all other lights or additional farkles turned off. What is happening is: after start up, the alternator starts charging, and the battery recovers from the starter motor drain/load. Then, when the battery is fully charged, the voltage regulator starts to limit the charge going to the battery: essentially, by turning off and on very, very quickly. The oem 3w bulb cannot react to this tiny fluctuation in current, but a led can. Leds are very sensitive and will indicate very small current fluctuations. If you notice this flicker under these specific conditions: there is nothing wrong with your charging system- as long as this dim flicker is occurring with all your lights off between 1700-2500rpm. Turn your headlight on, forget about it, and go for a ride!
If your GEN light is flickering or glowing dimly all the time- even with your headlight on, you may have a charging problem, and should diagnose that separately.
ABOUT TURN SIGNAL RELAYS:
This information applies to 1974- 1976 /6 and 1977-1980 Instrument gauges and relays only! The electrical design of the turn signal wiring changed in 1981 models and those models use a different relay mounted under the gas tank.
The early /6s came with the oem Hella 2479 flasher relay. The /7s and later came with the Hella 3425 flasher relay. This is the currently available flasher relay for all these bikes, part # 61 31 1 358 194 which costs about $85. The flasher has a rectangular body, and comes with a riveted on clip that clips onto a bracket in your headlight bucket. The early Hella 2479 can, over decades of use, develop an internal short which will cause both the oem dash indicator and a KATDASH dash indicator to glow. Here is how to identify the Hella 2479 short.
The oem Hella flashers have a “bulb out” feature; this means when you have a signal bulb out, the dash indicator (and turn signal) will flash once, then not light at all. This is supposed to tell you to check your bulbs. What this also does, is make the flasher unit not work with led bulbs in the actual turn signal units- because an led draws so little current, the Hella flasher relay reads that as ‘bulb out’. This means if you have led bulbs in your turn signals, the dash light will also not flash- do not expect it to, as it is driven by the flasher relay. If your dash indicator is not flashing now, you need to figure out why- KATDASH will not fix a bad flasher relay, bad ground connection at the turn signals, (which is quite common) or led bulbs/ ‘bulb out’ indicator. It WILL fix bad flex, broken copper connectors and corroded connections on the dash bulb carrier.
 There are commonly available flashers at your local auto parts stores that will work on the 1974-80 bikes for around $15- but they do NOT have the bulb out feature. The 2 mechanical flashers that will work with
these bikes are: flasher relay EL13, and flasher relay 550. These are 3 pin flashers and do not have a ground connection. See: flaps-relay for connection info. These flashers have a round/barrel shaped body and do not conveniently clip onto the relay bracket in the headlight bucket.
If you want to run LED bulbs in your turn signals you MUST install a electronic flasher relay that is capable of operating with very low current. AND ! ! You CANNOT install led bulbs in the 1981-1995 bikes! In 1981 BMW changed the wiring circuit such that it requires the 2-21w bulbs (on the active side) to use up enough current so that the other/non signaling side does not light up. There is a continuous connection loop through the instrument pod. Unless you are going to wire in enough resistance to use up that current: and at that point- why bother with leds?
I have tested these alternate flashers with my KATDASH and various led signal bulb configurations. The 550 & EL13 will work with 1 led bulb per side. Either front or rear- but not both. The 550 will flash slightly slower with 1 led installed per side.
 The FL3 flasher I’m offering here on my web site is a 3 pin electronic flasher, and will work with the standard 12v light bulb setup, and/or with led bulbs. This flasher has a red rectangular body, and comes with an angle bracket that you can use to connect to the headlight bucket bracket. It does NOT make any clicking sound or noise when the signals are activated! I am also supplying mounting bolt & nut with it, so it’s ready to install in your headlight bucket. See: FL3-relay-install for installation & connection diagram. Please note! This is a flasher relay for the 1974-80 Airheads; version 1 & 2 of the instrument pod only! There is a different flasher relay for the 1981-on bikes. See out “Slash 5” page for the /5 relay.
LED 1156 TURN SIGNAL BULBS
There are many 12v 1156 bayonet socket LED bulbs available now from many sources. Most give insufficient light output in daylight. LEDs in particular have a very narrow focus angle- most project in a 30° forward angle where an incandescent bulb is 360°. This means that none of the reflector is being used by a led, and the cut lens, which has very specific, Fresnel type focusing and reflecting properties- is also not being utilized to make your indicator signal bright and visible. This is why you need a LED bulb cluster with many chips, facing on 4 sides and the top. Even then, it just does not match the common 1156 incandescent bulb brightness. See the photo below.

I have tested a lot of different led bulbs for fit and brightness. Many just are not very bright, and have very poor light projection patterns. Most will NOT fit the aluminum turn signal pods from 1970-74. The reflector in these pods has a slightly deeper socket, and the wider collar/bottom deck on the typical led assemblies will bottom out. I have now found a led bulb that WILL fit the aluminum turn signal pods, (/5s &1974 /6) and is actually bright enough to be visible in daylight: the 57-500 shown above.
Many riders want to switch to LEDs for the lower current draw, as well as longevity. These are both logical reasons, but ultimately- you want a BRIGHT light to make your turn indicator & your bike visible to, and noticed by, the other cars on the road. The photo above shows comparative brightness. I also took an edge photo to get an indication of lens utilization. (photo below) In the long run, no 1156 LED (at this time) can match the brightness of the stock 1156 incandescent. The stock bulb is also easily available at every auto parts store in the US.
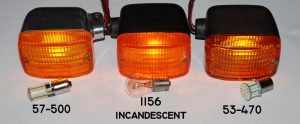
As shown in the photos, I did a comparative test with the 3 bulbs side by side, installed in an actual turn signal. Typically, brightness of a bulb is indicated by “lumens”. Your standard 60w incandescent bulb is about 800 lumens. Most of the various light measurement calculations take into account angle and distance to lighting a specific size area. Typically referring to a work surface, from the ceiling of a room. Not really applicable to this. I’m not a lighting engineer, but I do have a meter that reads “lux”, which is another measure of luminance. I tested these three bulbs, in a dark room to get a brightness reading in Lux:
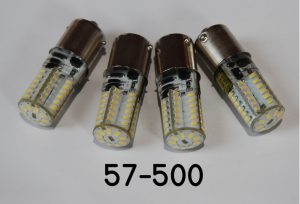
LED 57-500: Manufacturer says 5 watts ( I measured it at 3w), 360°, 500 lumens. White. I measured 500 lux at 12” directly in front- no amber lens. These will fit ALL turn signal reflector sockets from 1970-1995. 57 bright white led chips with a clear silicone cap that makes them waterproof. 4 pack for $25.
1156 Incandescent: standard oem 25w bulb. White. 1750 lux at 12” directly in front- no amber lens.
Please see our “ORDER PARTS” page to purchase any of these bulb sets.
If you install LED bulbs, you MUST install a led compatible electronic flasher relay!
If you want to install LED bulbs in your turn signals you MUST install an electronic flasher relay that is capable of operating with very low current. There are 3 different relay types over the Airhead models from 1970-1995. There is not one relay fits all!
You CANNOT install LED turn signal bulbs in 1981-95 bikes!! In 1981 BMW changed the turn signal wiring circuit by connecting the 12v THRU the single turn indicator on the dash. There is no ground at the dash indicator: it relies on the 2-25w bulbs on the active side to use up enough current so that the other/non-signaling side is the ground and does not light up. There is a continuous 12v loop through the instrument pod on all the bikes with a single dash turn indicator. The bikes that have a left & right indicator (Some R65s, 91-95 GS) do not have this loop.
SLASH 5: If you have a /5, with the turn indicator in the headlight bucket; you also have the continuous 12v loop through the stock turn indicator bulb. However with the /5, as opposed to the late RT &RT bikes, you can access just the turn indicator wiring harness separately. We have built a replacement wiring harness that includes 2 properly color coded wires with diodes to interrupt the loop circuit, along with a ground wire. You can replace your existing turn indicator wiring harness, install a LED compatible flasher relay and LED turn signal bulbs. You can also install a LED turn indicator bulb, or keep the stock incandescent indicator. All of these parts are available on our Slash 5 page. If you install LED bulbs in your /5 turn signals YOU MUST CHANGE THE TURN INDICATOR WIRING HARNESS!. You can build your own with diodes to control the current loop, or you can buy ours- but you cannot install LED turn signals without removing the 12v loop connection at the turn indicator.
ABOUT FOGGY INSTRUMENTS:
We’ve all had this happen- you get stuck riding in the rain, and then you have fog/condensation inside your instrument pod- which of course gathers on the lenses over the dials because they’re on the top side, and they’re a cold surface. Let’s face it- BMW put about a million holes in the back of the instrument pod, which of course faces into wind driven rain when you ride. There are 2 sealing gaskets in the pod back to try and keep the moisture out. If you re-new both these gaskets, you will be able to keep 90% of the moisture out. The rest is just physics- since it’s not a space pod, the inside will ‘breath’ with variations in temperature and local air pressure. If it sucks hot, humid air (Georgia in the summer) in during the day, then there is moisture in there to condense on a cool night. 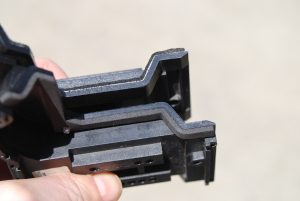 Generally, unless you get stuck in the aforementioned rain, the normal everyday air expansion and contraction doesn’t cause condensation. I am selling both gaskets as a set: #62 11 1 356 671: the 20″ long, o-ring type cord that goes around the whole perimeter edge & #62 11 1 358 114 the neoprene, right angle, foam tape that goes on the inner edges of the ‘T’ shaped rear cover (BMW calls it the ‘cover lid’).
The oem foam seal that goes on the rear cover was a one piece, stamped out, right angle gasket that you had to supply your own adhesive to install. (this is so they could just have one stamp and flip it for installation on either side) The oem one piece seal #62 111 358 114 is NLA. I have had tooling done, and am supplying the 114 gasket in right and left pairs with a peel and stick adhesive back. This seal- on the inside of the ‘T’ shaped rear cover tends to be overlooked, and they usually are very old (original), cracked and completely compressed and non-sealing. See photo to above: new gasket on the bottom, oem on the top. Here are the installation instructions: Gasket Set Installation
And with regards to the oem bulbs, warming the inside of the pod (the gauge illumination lights are always on when the bike is running) and evaporating/drying interior condensation. It’s true, the bulbs generate a fair amount of heat and will dry the interior. But I was out riding my /6 recently, and got stuck having to ride to an event in the cold fall rain- about an hours ride. Later that afternoon, coming home- sure enough: foggy instruments. (I hadn’t gotten the neoprene foam tape stock yet, and my own rear cover has the original seal at the moment) Since I’ve got the led dash unit installed, I figured I would just have to give it a couple of days in the garage to work it’s way out. Halfway home, I was surprised to notice that my gauges were clear! The leds and their resistors DO generate some heat- not as much as an incandescent bulb, but it was apparently enough, in this case, to clear my instruments in 50° drizzle.
ABOUT INSTRUMENT POD MOUNTS:
All the instruments mount to a bracket off of the top plate with 3 M6 bolts or phillips head machine screws. As far as I can tell- many of the models had bolts. The BMW instrument mounting screw has a special head profile; it’s close to an undercut oval head- but with a rimmed edge. I don’t know where you’d find it other than a dealer part list. The bolt is a standard M6 bolt, and it’s a bit easier to access since you can get a wrench on it from the top.

But here’s the thing; the instrument mount originally came with a flat washer under the bolt, and this is important because without the flat washer, the bolt will extend into the pod too far. Without the washer- especially if you really crank it on tight- the bolt will contact the one of the inner mounting posts and push against it. (photo) This puts undue stress on the mounting post and insert, and many of them are cracked or the back of the threaded insert is broken out. In place of this flat washer, the dealers now list a standard M6 wave or spring washer. Wave washers are much thinner than a flat washer and are part of the problem. I recommend using a flat washer and a wave washer at your instrument mounting bolts. And don’t tighten the bolts down hard- we’re talking 40 year old, brittle plastic here. The plastic mounting flange will crack right off. Don’t ask me how I found this out.
ALL OUR INSTALLATION INSTRUCTIONS
KATDASH Slash 5 led Kit Installation Instructions
KATDASH Slash 6 Installation Instructions
KATDASH 7880 Installation Instructions
KATDASH 8195 Installation Instructions
KATDASH GS install instructions
Gasket Set Installation Instructions
FL3 Flasher Relay Installation Instructions
3-Pin Auto Parts Relay Connections